Let’s talk photography! We are going to break it down for you and share exactly what we use and why. Since there is sooo much photography information on the web, just Google any of the terms we use to see a wide array of articles, pictures, definitions,etc.
We’ll cover this in 3 parts:
1. The camera
2. The lenses
3. The post production software tools
But first, just to cut to the chase, here is an overview of what we use…we’ll explain “why” in the 3 parts…
What we use
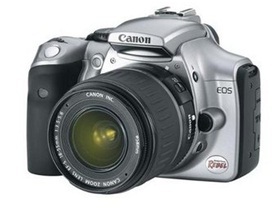
 We use an old Canon DSLR (digital single lens reflex) camera, an SLR camera is the kind that you can attach lenses to, and the D means they use memory cards instead of film. Ours is now referred to as a 300D, but when we bought it everyone was just calling it the “Digital Rebel”. It is the original Canon DSLR that came out in October 2003. It was revolutionary. We’ve had newer and more expensive Canon cameras, but this is our old faithful, like a good old dog that just does what you want. Man we love this camera. It’s been to Africa, South America, Europe, all over, and it’s never let us down.
For lenses we use 3 fixed focal length lenses, (also called portrait lenses). Here are links to the descriptions for the 2 main ones, (the third one we use is a 30mm f1.4, but we don’t use it very often). These lenses are not common, and really used by photographers more than anyone else. In fact, we just looked on Ebay and you can’t find any of them. But when you just Google it, you can find them. They aren’t cheap, but this is the game changer. This is what makes our photography above average.
For post production software, we use Photoshop Elements 7 (PSE 7). You can get a free trial online, or buy Elements 8 at Costco for $49. We tested Adobe Lightroom thru their free trial last year, which was amazing, but elements does everything we need it to. And we’re pretty frugal, so we decided we didn’t need lightroom. The number 1 function we use PSE for is saturating our photos. This warms them up and makes the colors ‘pop’.
Here are pictures of the lenses we use. The 50MM Lens: This is a low end 50mm lens, (because it’s a f1.8). If you get the f1.4 it’s like $350.
The 85mm. This is our work-horse. We use it the most. It’s a game changer.
Okay, let’s talk cameras, lenses, and post production software.
Cameras
Our recommendation is simple – If you want the best pictures, then you’ve got to move away from a ‘point and shoot’ style camera, and get into the DSLR cameras. Our DSLR is probably the cheapest one you’ll find, (here is a link to them on Ebay). Looks like you can get one for a couple hundred dollars, we’ve seen them go for less on Ebay. When they were new they were $999. If our old faithful 300D dies, we will probably get a used 40D rather than a brand new Canon.
Amazon: Canon EOS Digital Rebel 300D
The reason DSLR cameras are important is because they allow you to use sophisticated lenses, which is the #1 game changer that separates the ‘hey look at my nice picture at the beach’ type pictures into, “Wow, are you a professional photographer” type pictures. DSLR’s generally are geared to allow you to control what you’re doing very carefully as well, but the #1 attribute, (in our opinion), is the ability to attach special lenses. Now days, there are really 2 popular DSLRs, Canon or Nikon. Either is great.
Lenses
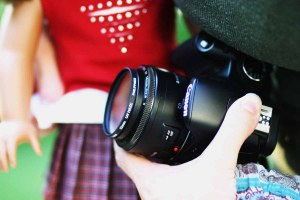
(This pic is of our 50mm lens on a newer DSLR that we had, but got rid of because old faithful was better)
 With lenses you’ve got 2 basic options. A Fixed Focal Length lens, or a lens with an adjustable zoom, (meaning you can zoom in to focus on something, then zoom out to focus on something else without physically getting up and walking around). With a fixed focal length lens, it will focus on different things automatically, at different distances, but there is no zoom. So if you want to get closer or farther away, you stand up, and walk around.
Beyond these 2 basic choices, you get into a crazy number of options. And of course, there are lots of opinions, but, as you can tell by what we personally use, we believe strongly that a fixed focal length lens will produce the best result. So we won’t even cover zoom lenses in this post. Needless to say, when you go look at cameras, they always come with a zoom lens. And generally, you’re not going to find fixed length lenses at Best Buy.
These lenses allow you to shoot in lower light and not use a flash. NOT using a flash is a key to getting great shots.
If you want a fixed length lens, you’ll need to shop online, they have them at Amazon, or visit an old-school camera shop in your community. Our 30mm, 50mm, and 85mm fixed focal length lenses provide us with all the options we need to shoot everything we want to shoot.
Going deeper with fixed length lenses. As usual, there are options that make fixed length lenses more expensive, or less expensive. The aperture (or F stop) is the lens function that allows light to come into the camera. Google it to learn more, but bottomline, the smaller the f-stop number a lens will go to, the more expensive that lens will be, and generally the better the images it can produce. So, a 50mm lens with a f/1.8 (that’s how you’ll see this function described) like the one we use, (the one pictured above), goes for about $90. But a 50mm lens with a f /1.4 goes for$350+. The highest quality lenses generally go to f / 1.2 and use something called L-series glass. These are the types of lenses that can shoot at night without a flash. Those lenses are around $1,000 and up. No need for that!
Here is a link to one on Amazon: Shop for it at Amazon
Bottomline on camera and lenses:
Our best advise for the camera and lens, to someone who is frugal, or not in a position to spend much, but wants to take their game to the next level is to get a used Canon (or Nikon) DSLR, and a 50mm f/1.8 lens, or something similar. This set-up will probably set you back about $350, (we’d guess).
Software
Software is easy. Get a trial version of Adobe Photoshop Elements and try it out. You’ll like it. Photoshop Elements is the ‘light’ version of “Photoshop” Adobe’s premiere image software. Overall though, if you’ve got a good lens, and shoot in good light, you’re not going to need to do very much to your pictures after you take them, in fact it’s generally better if you don’t do much. However, there are a couple things we regularly do, which we’ll mention:
Crop them – you can do this on any software. Just tighten up the image to only include what you absolutely need to have people see.
Saturate them – this warms up the colors, especially if your light wasn’t good. But be careful, if you satuate pictures too much, the colors will be presented differently to your online customers than the garment looks in real life…you don’t want that, so don’t saturate too much. Usually just a little goes a long way.
Concluson
Photography work is like any other performing art where an instrument is used – a great photographer can get great pictures on a point-and-shoot camera. But give them a DSLR with a great lens, and they’ll blow your mind. To get good you need to master the basics, then get equipment that lets you do a few special things, (like shoot without a flash). If you follow our advice in this post, and our advice in the 10 tips post, you’ll be well on your way to radical improvements in your photography. And remember, just like any performing art – practice makes perfect.
And last but not least – some of you are AMAZING photographers! Please share your knowledge, and or links to articles you’ve found helpful.
2 Comments on Photography Gear, what we use, and why
Comments are closed.


Great information! Many thanks.
Awesome read!!!! Very helpful. Thank U Bunches from Love U Bunches!